FAQs
- C# Sample Application for the BB-400
- Set up of your development Environment
- Create your first project with the BB-400
- Add Brainboxes.IO .NET API
- Monitoring and Controlling BB-400 IO Lines
- Running and Debugging the Program on your computer
- Modifying IO state and seeing the result in the program
- Build the application and run it on the BB-400
- Next Steps
C# Sample Application for the BB-400
The BB-400 allows software to be written for it in many different software programming languages. Brainboxes provides familiar API’s (Application Programming Interfaces) when working with C# and the .net programming environment. Using C# to write your program for the BB-400 has the following benefits:
- Write and debug code from your platform of choice, deploy to the BB-400 and it will run the same
- Well supported and free development environment which runs on Windows/Mac or Linux using Visual Studio Code
- Brainboxes supported API’s through C# which talk to the hardware interfaces of the device
- Docker container support when deploying your application across many BB-400’s
Set up of your development Environment
- Install .NET Core SDK available here https://www.microsoft.com/net/download
- Install Visual Studio Code available here: https://code.visualstudio.com/
- Attach your BB-400 to the same network as the development PC using the Uplink Ethernet port or the WiFi connection
Create your first project with the BB-400
- Open Visual Studio Code, see this url for a overivew of the user interface: https://code.visualstudio.com/docs/getstarted/userinterface
- In the top menu go to: View > Terminal
- A terminal will appear at the bottom of the Visual Studio Code Window (in the Panel)
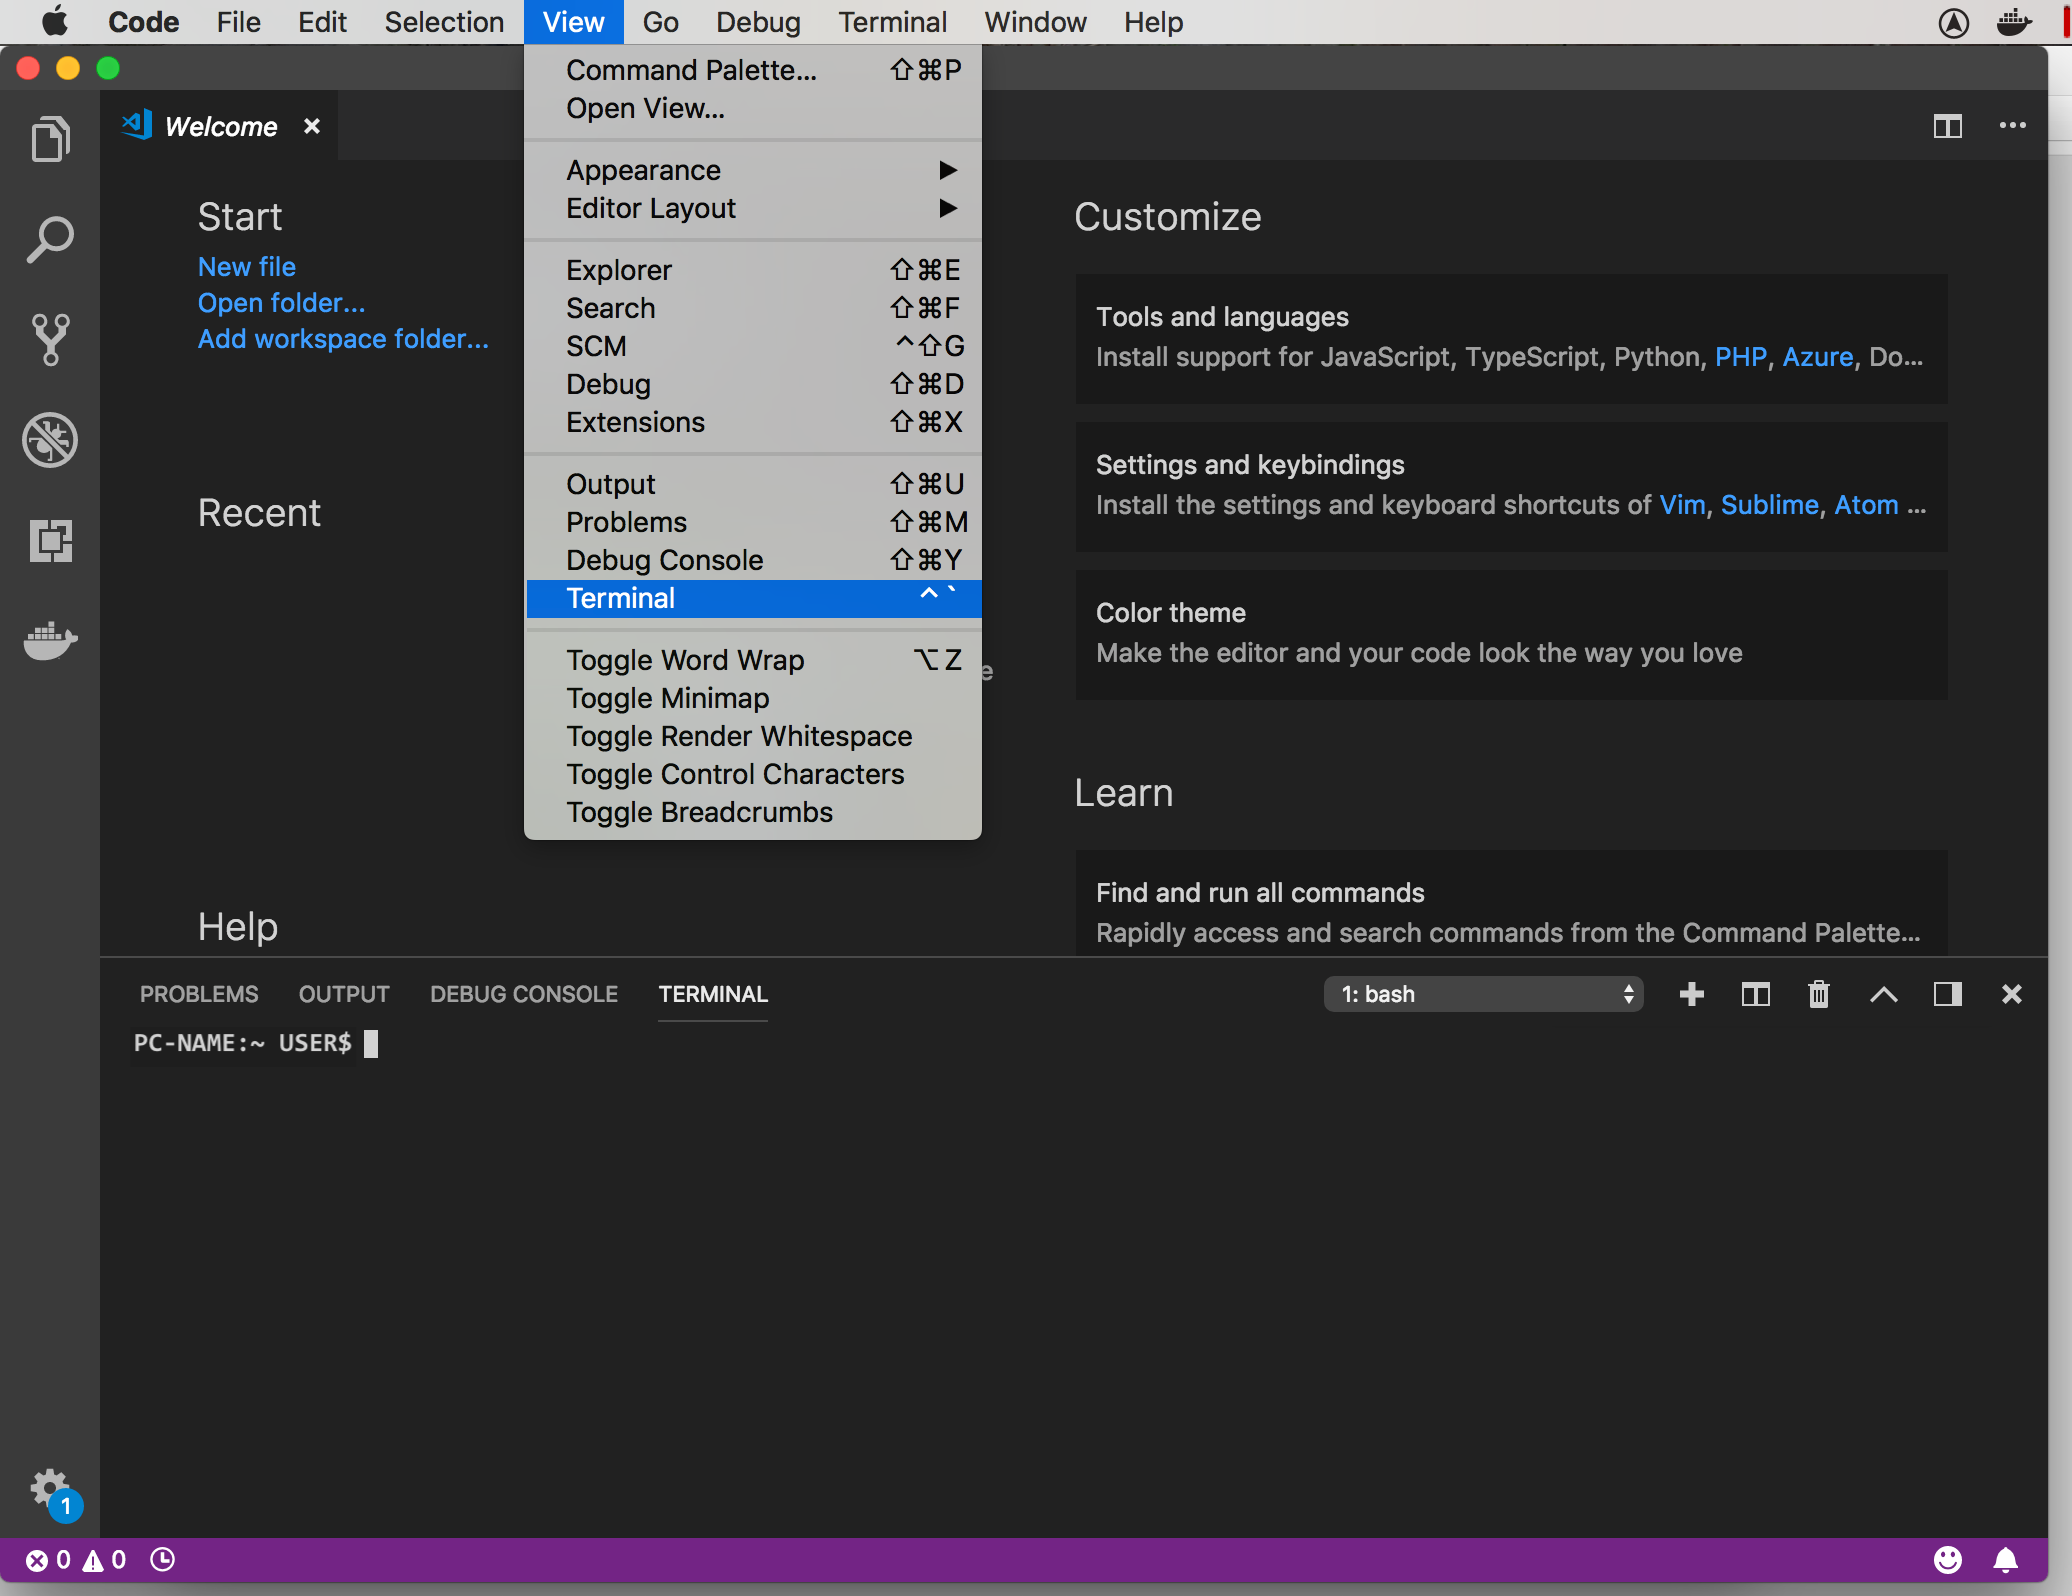
- In the terminal type the following commands at each command prompt ($):
$ cd Documents/ $ mkdir bb400project $ cd bb400project/ $ dotnet new console - The dotnet runtime should then automatically create the files required for a console application in the bb400project folder
- Note there any many other types of project template which can be created, e.g. for a web application, for more info see: https://docs.microsoft.com/en-us/dotnet/core/tools/dotnet-new
- Now open the newly created project in visual studio code, in the main menu click Open Folder, navigate to the bb400project folder and open
- On the left hand side menu (Side Bar) you should see the project files, double click on
Program.csthis is where we will write our BB-400 code
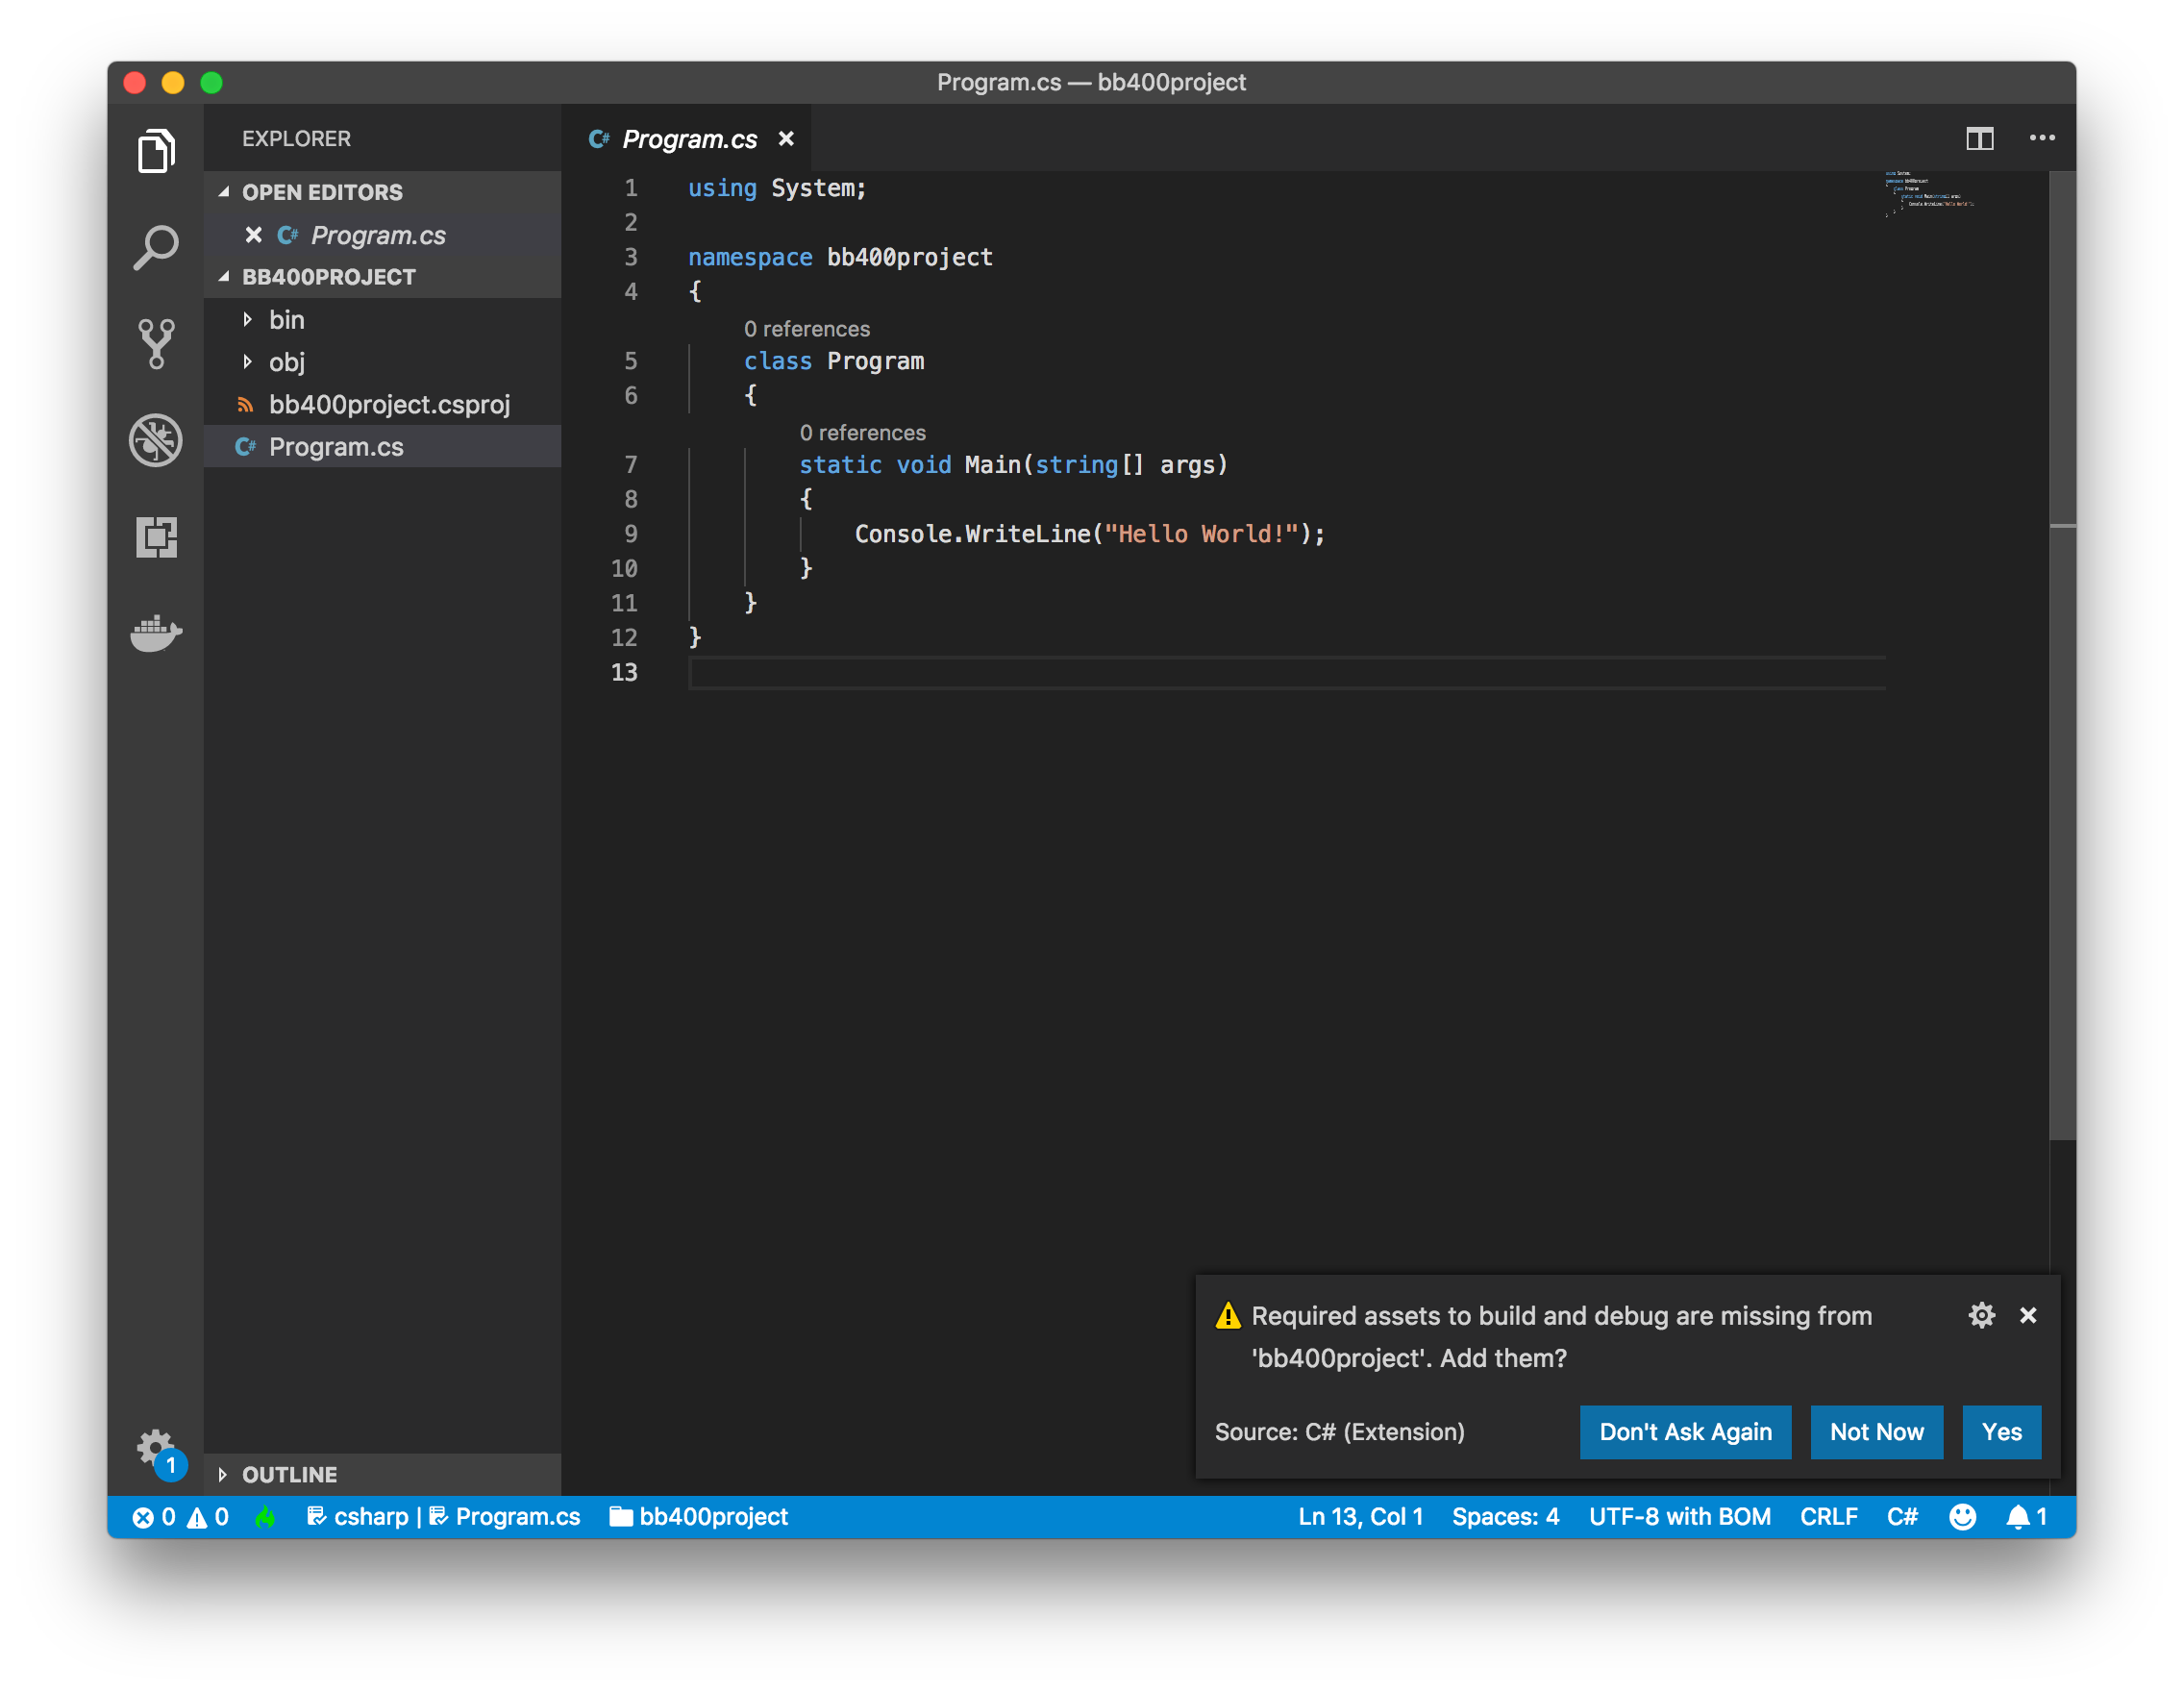
- Visual Studio Code may ask you to install additional items, these allow editing and debugging of C# programs, click YES when asked
Add Brainboxes.IO .NET API
- The brainboxes.io .net api is a .net library which allows for easy programming of the BB-400 and brainboxes other products.
- The brainboxes.io api is stored in NuGet which is an online repository for .NET code, libraries and APIs.
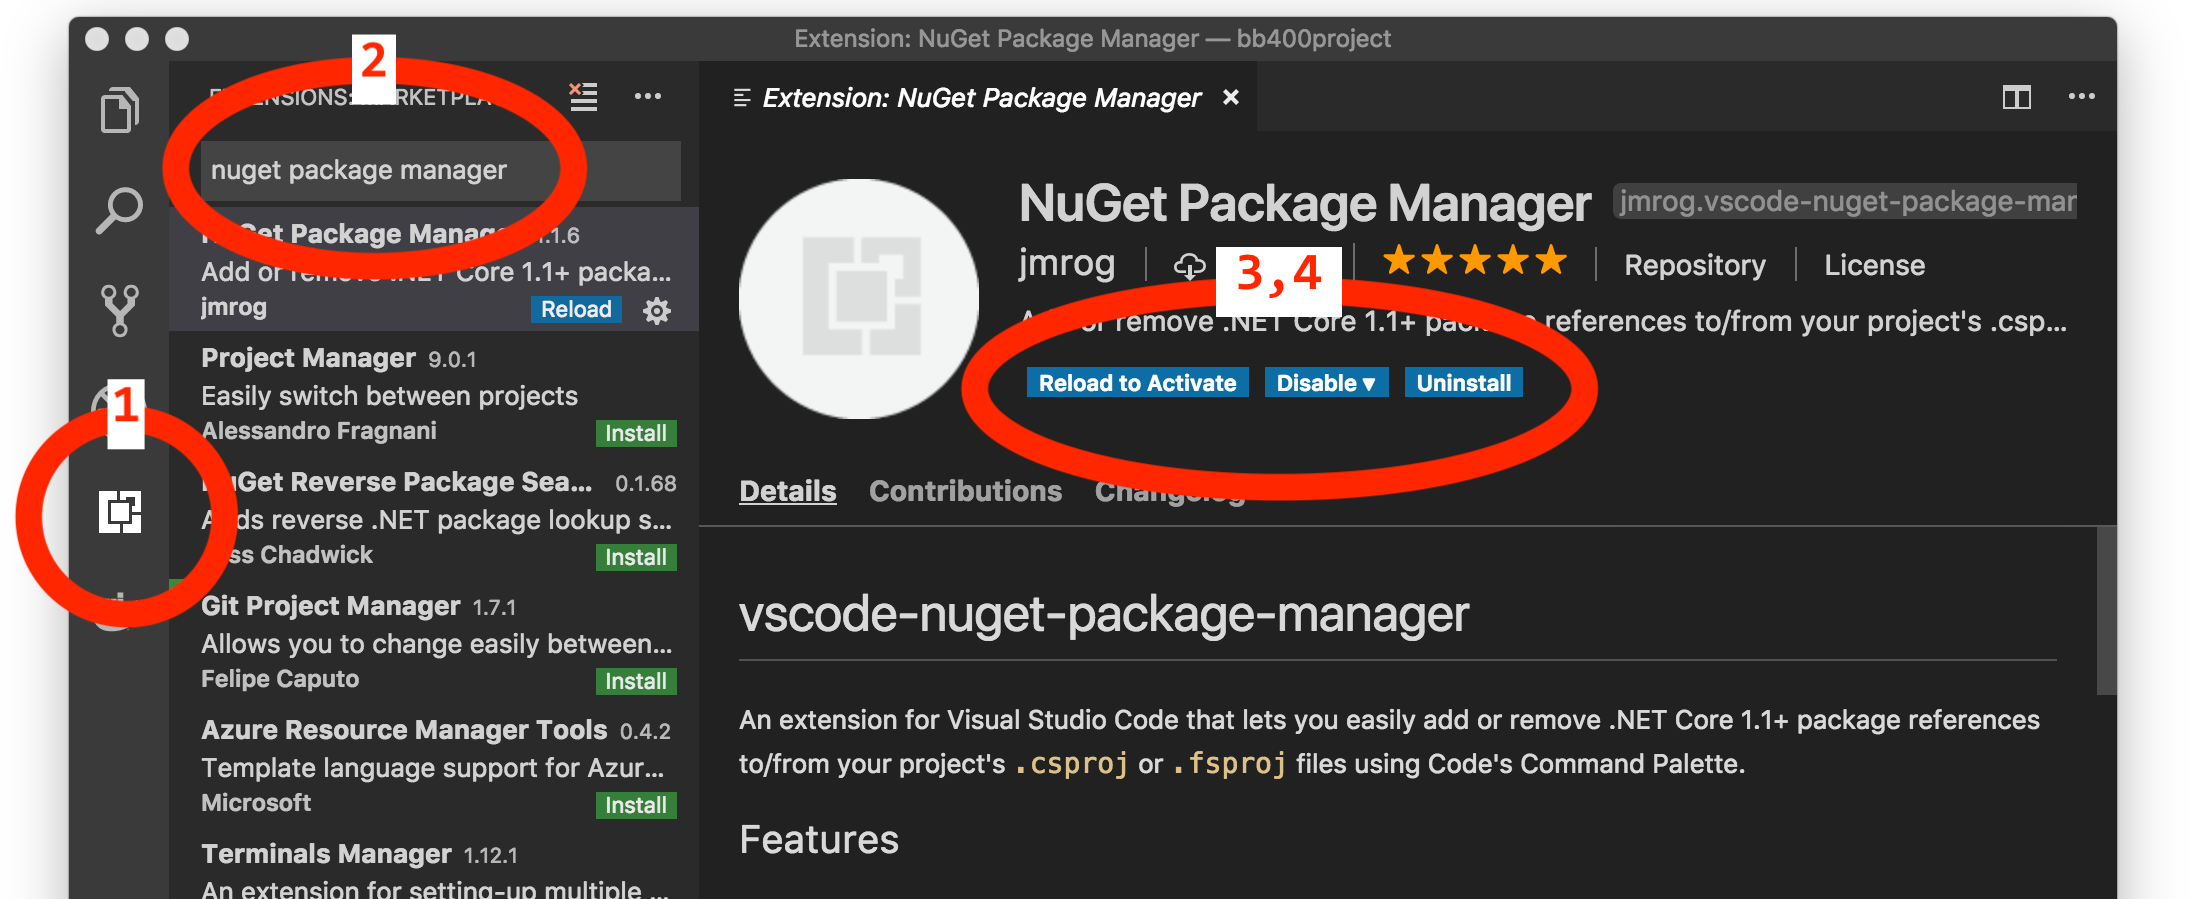
- In Visual Studio code install the ‘NuGet Package Manager Extension’ by clicking on the (Activity Bar) extension icon and searching for Nuget Package Manager in the extension Side Bar
- Install the package manager, then click ‘Reload to Activate’
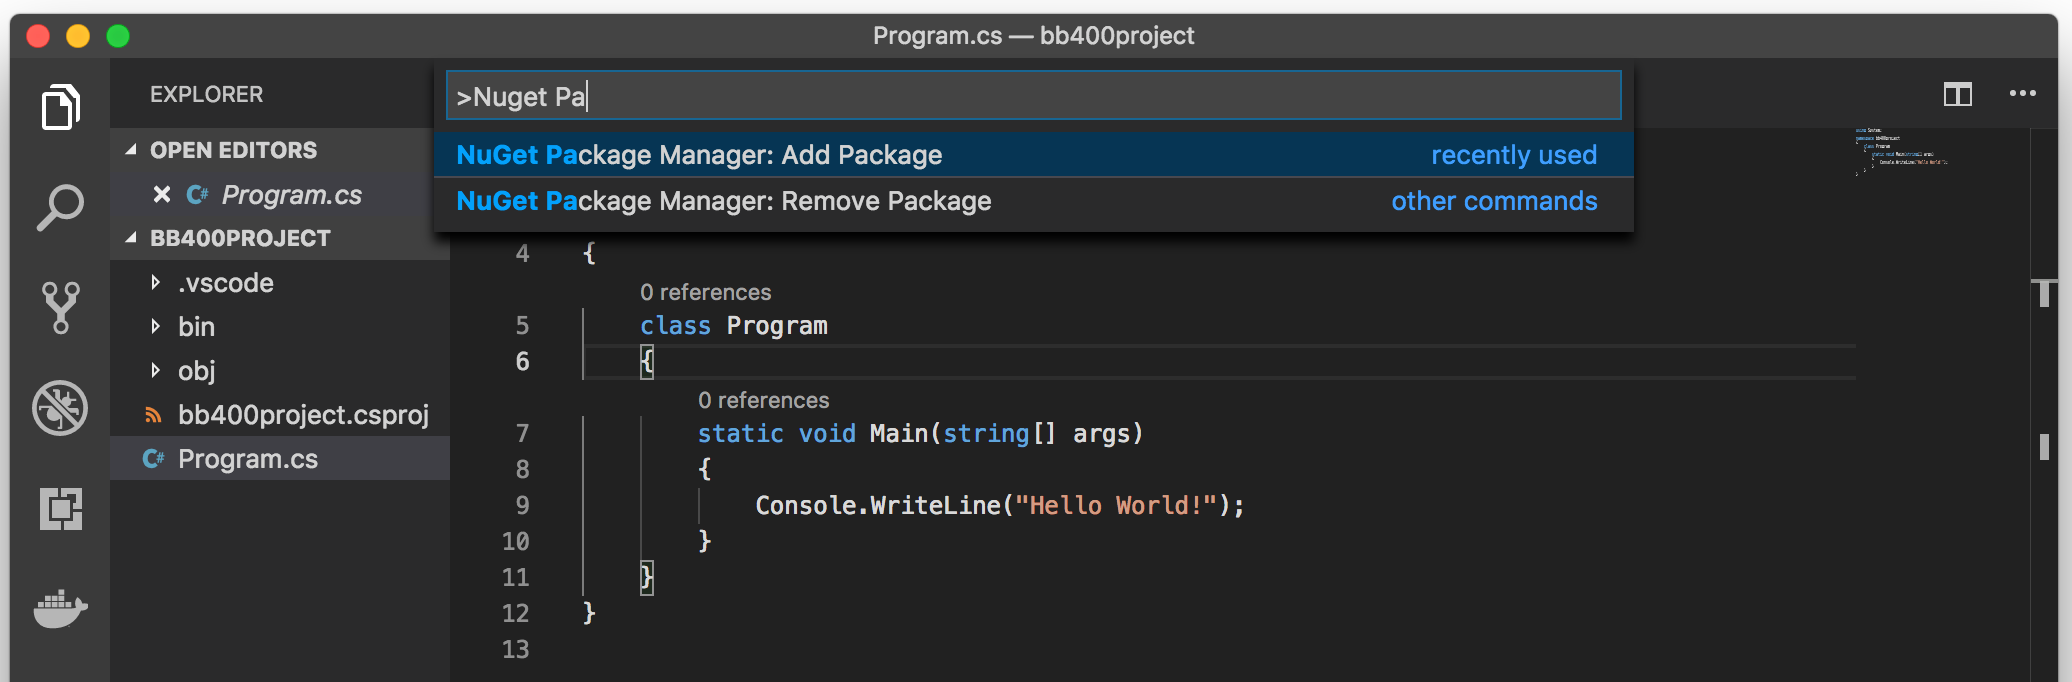
- Go back to the Program.cs file. Visual Studio Code has now added the extension, this will give extra commands through Visual Studio Codes Command Palette (https://code.visualstudio.com/docs/getstarted/userinterface#_command-palette)
- Open the command palette by pressing
<SHIFT>+<CTRL>+Pon Windows or<SHIFT>+<CMD>]+Pon Mac. In the Command Palette type:
Nuget Package Manager Add <ENTER>(use arrows to autocomplete command)
- Then type:
Brainboxes.IO <ENTER> - Then choose Brainboxes.IO from the suggestion list (use arrows and enter key)

- Then select the latest version, by selecting the highest version number (at time of writing 1.5.0.6)
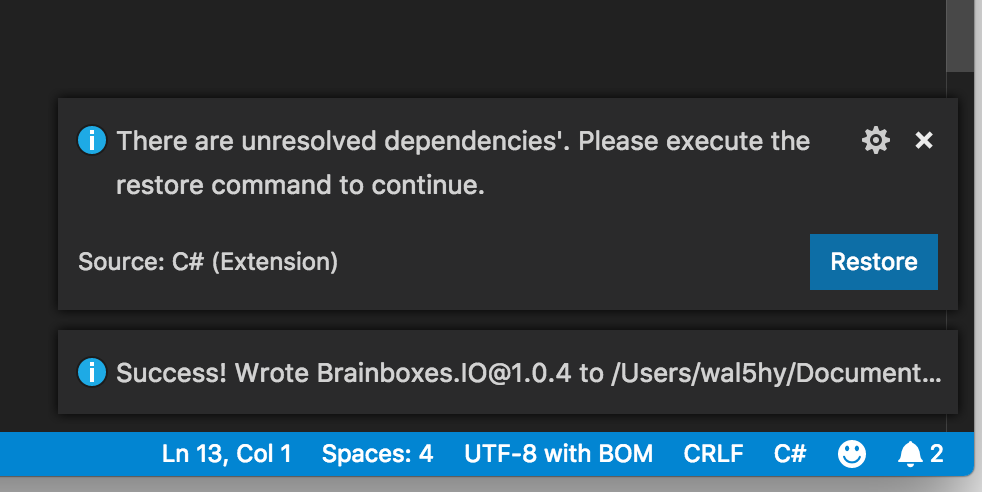
- Click the restore button to add the Brainboxes.IO package to the bb400project.
- In the Program.cs file add the line
using Brainboxes.IO;on line 2 - Now the brainboxes API is available to use in the code
Monitoring and Controlling BB-400 IO Lines
- Now you can edit the code in
Program.csto monitor and control the IO on a BB-400. - Change the
Program.csfile to be the following, edit the IP address on line 11, and save the file:
using System;
using Brainboxes.IO;

namespace bb400project
{
    class Program
    {
        static void Main(string[] args)
        {
            // update this value to the IP address of your BB-400
            string ipAddress = "192.168.0.85";
            BB400 bb = new BB400(new TCPConnection(ipAddress));

            Console.WriteLine($"Connecting to BB-400 at address {ipAddress}");
            bb.Connect();
            Console.WriteLine("Connected!");

            Console.WriteLine("Monitoring all IO lines for changes");
            // when a DIO line changes can the function IOChangedEvent
            bb.IOLines.IOLineChange += IOChangedEvent;

            // based on an IO change you could:
            // - send an email
            // - store result in a database
            // - signal a machine by changing an output of the BB-400 e.g. over serial, bluetooth, io
            // - combine the state with the state of other lines
            // - send a message to another device on the network
            // - send a message to the cloud
            // - send a message to another BB-400 to trigger an output IO line

            // see follow on FAQ's on brainboxes.com for how to do this

            Console.WriteLine("Setting DIO 0 ON");
            bb.Outputs[0].Value = 1;

            Console.WriteLine("Toggling State of DIO 1");
            bb.Outputs[1].Toggle();

            Console.WriteLine("Press any key to exit");
            Console.ReadKey();

            Console.WriteLine("Key Pressed, disconnecting and exiting!");
            bb.Disconnect();
        }

        private static void IOChangedEvent(IOLine line, EDDevice device, IOChangeTypes changeType)
        {
            //This function is called in a background thread,
            // the main thread is paused at the Console.ReadKey() line
            // but this background thread can continue as normal
            Console.WriteLine($"{line} has changed new value is {line.Value}");
            //DIO lines are can be either inputs and outputs
            //but in code treated as 2 separate lines
            //sometimes when an output is changed, the corresponding input may change
            //this is normal behaviour: if you are using a line as an output, ignore its input state
        }
    }
}
Running and Debugging the Program on your computer
- Running and debugging code in VS Code requires a few steps to set up and then is very straight forward.
- Click on the Debug symbol on the activity bar, at the top of the debug side panel click on the cog to create a new debug launch configuration. If prompted by the command palette to select environment choose the debug type to be
.NET Core
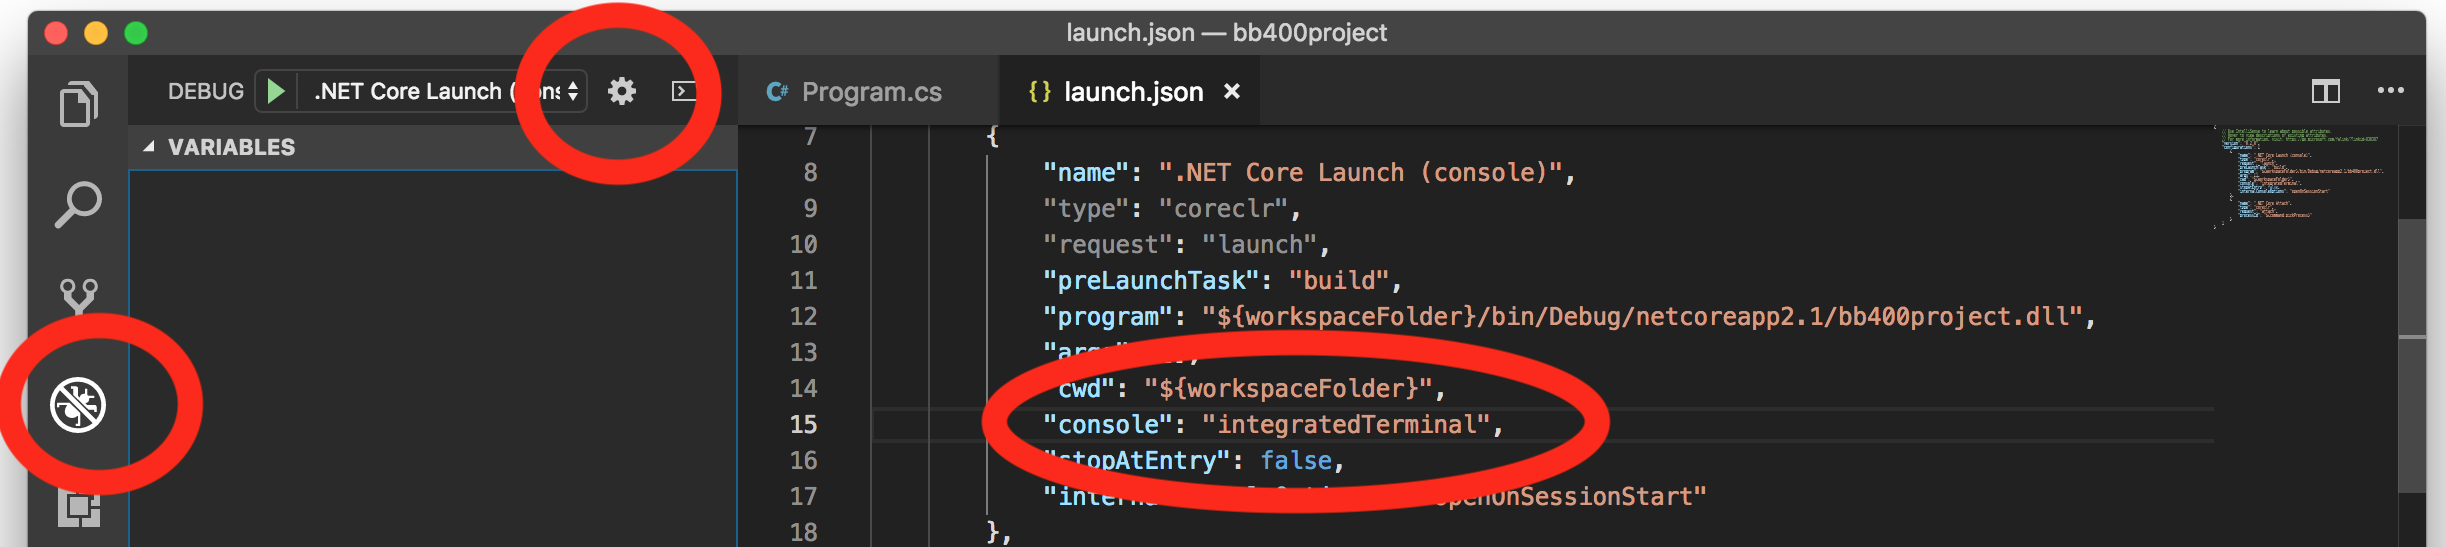
- A new file launch.json will appear, in the json object with name
".NET Core Launch (console)"make sure to change the json property"console"to be"integratedTerminal"this will allow the code we have written to listen to user input on the console. - You can add a break point to your code, in
Program.csfile create breakpoint at line 14 by click to the left of the line number so a red dot appears. - Click the GREEN PLAY symbol in the Debug side panel to begin debugging.
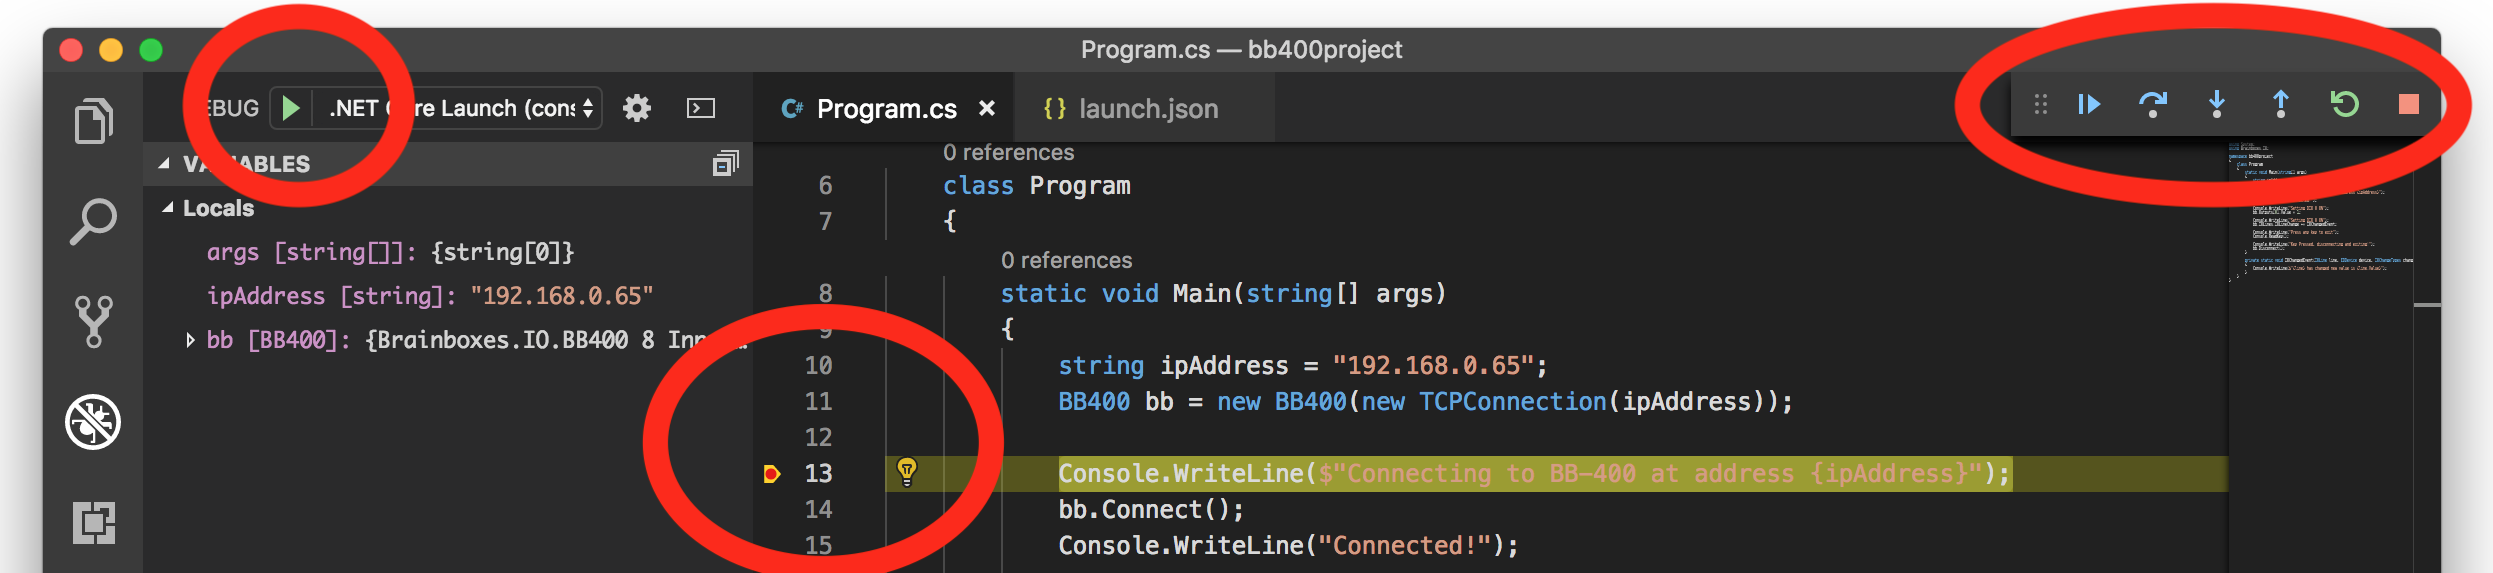
- The program will begin, then stop when it reaches the breakpoint.
- At the breakpoint a yellow arrow will appear, this is the line the program is up to. In addition the program variables can be seen in the debug side panel and the VS Code debug controls
 will appear. Press the Blue continue button to carry on debugging.
 - Click on the Terminal Tab in the Panel at the bottom to view the output from the program
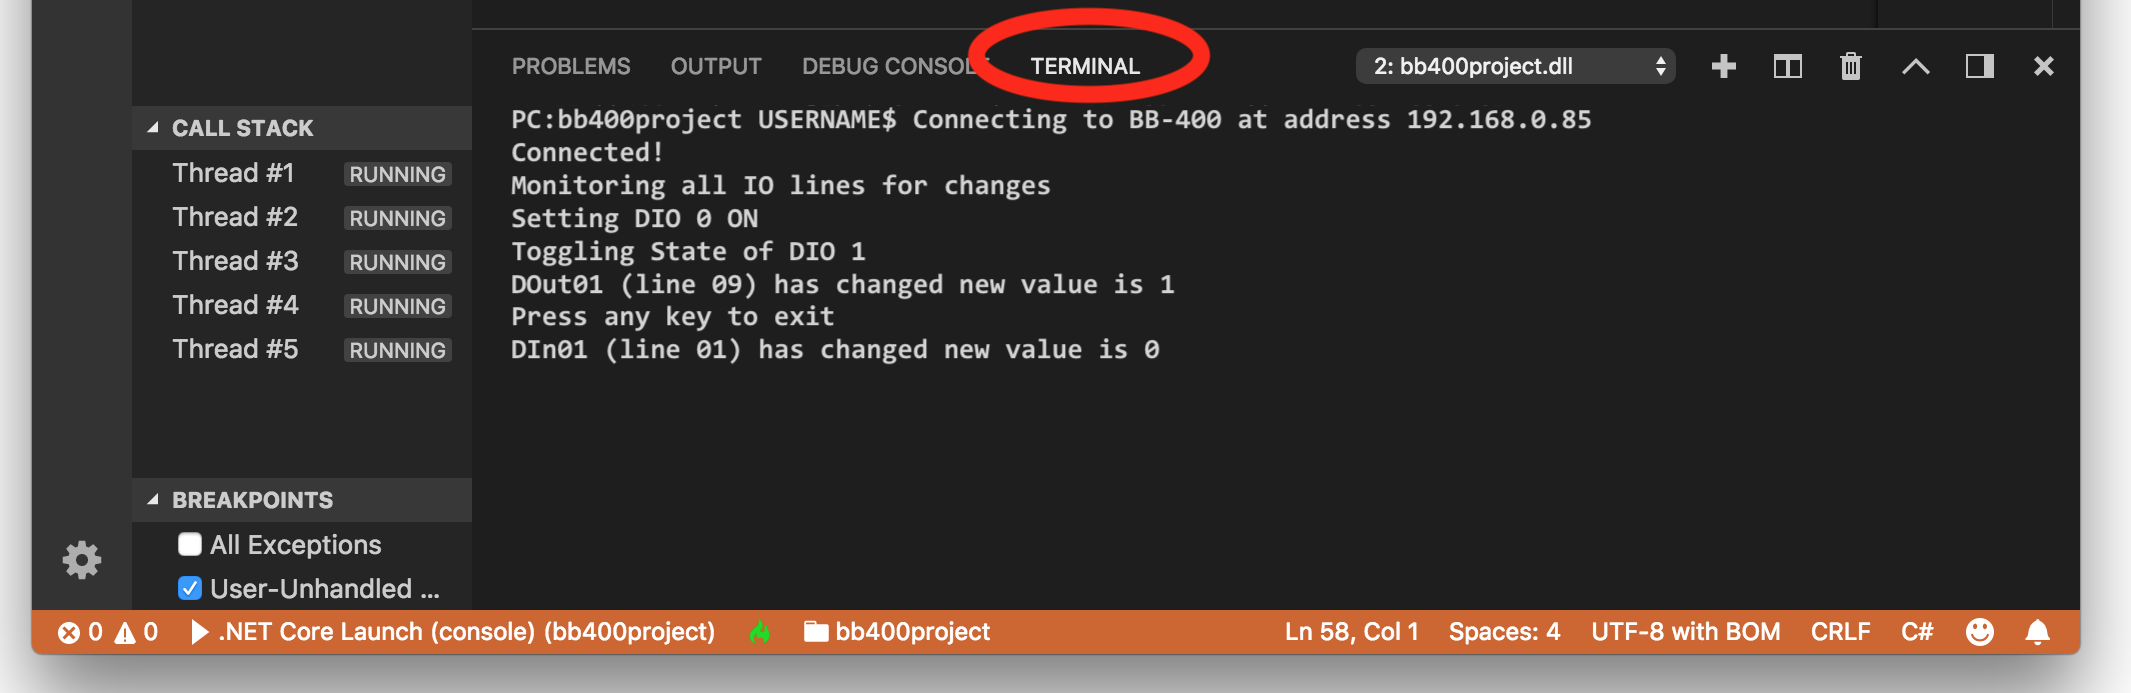
- End the running debug session at any time by pressing a key while the program is running.
Modifying IO state and seeing the result in the program
- Begin debugging the program again
- Open a web browser and log in to the web-admin of the BB-400
- Go to the DIO tab in the BB-400 web-admin and check the checkbox ‘Clickable Outputs’
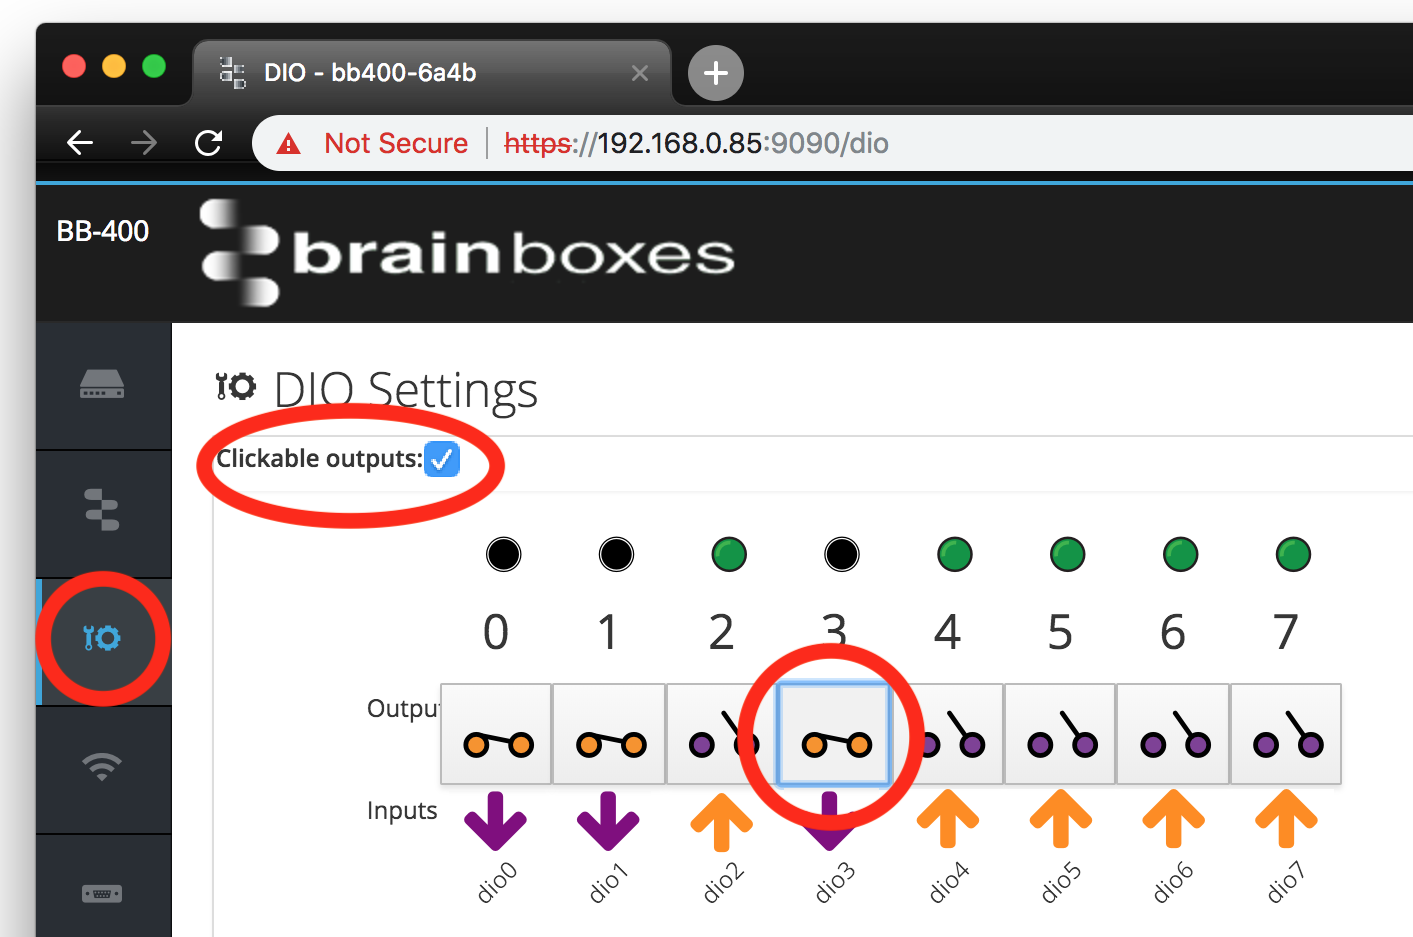
- The outputs of the BB-400 can now be changed by clicking in the web-admin interface, click output labelled
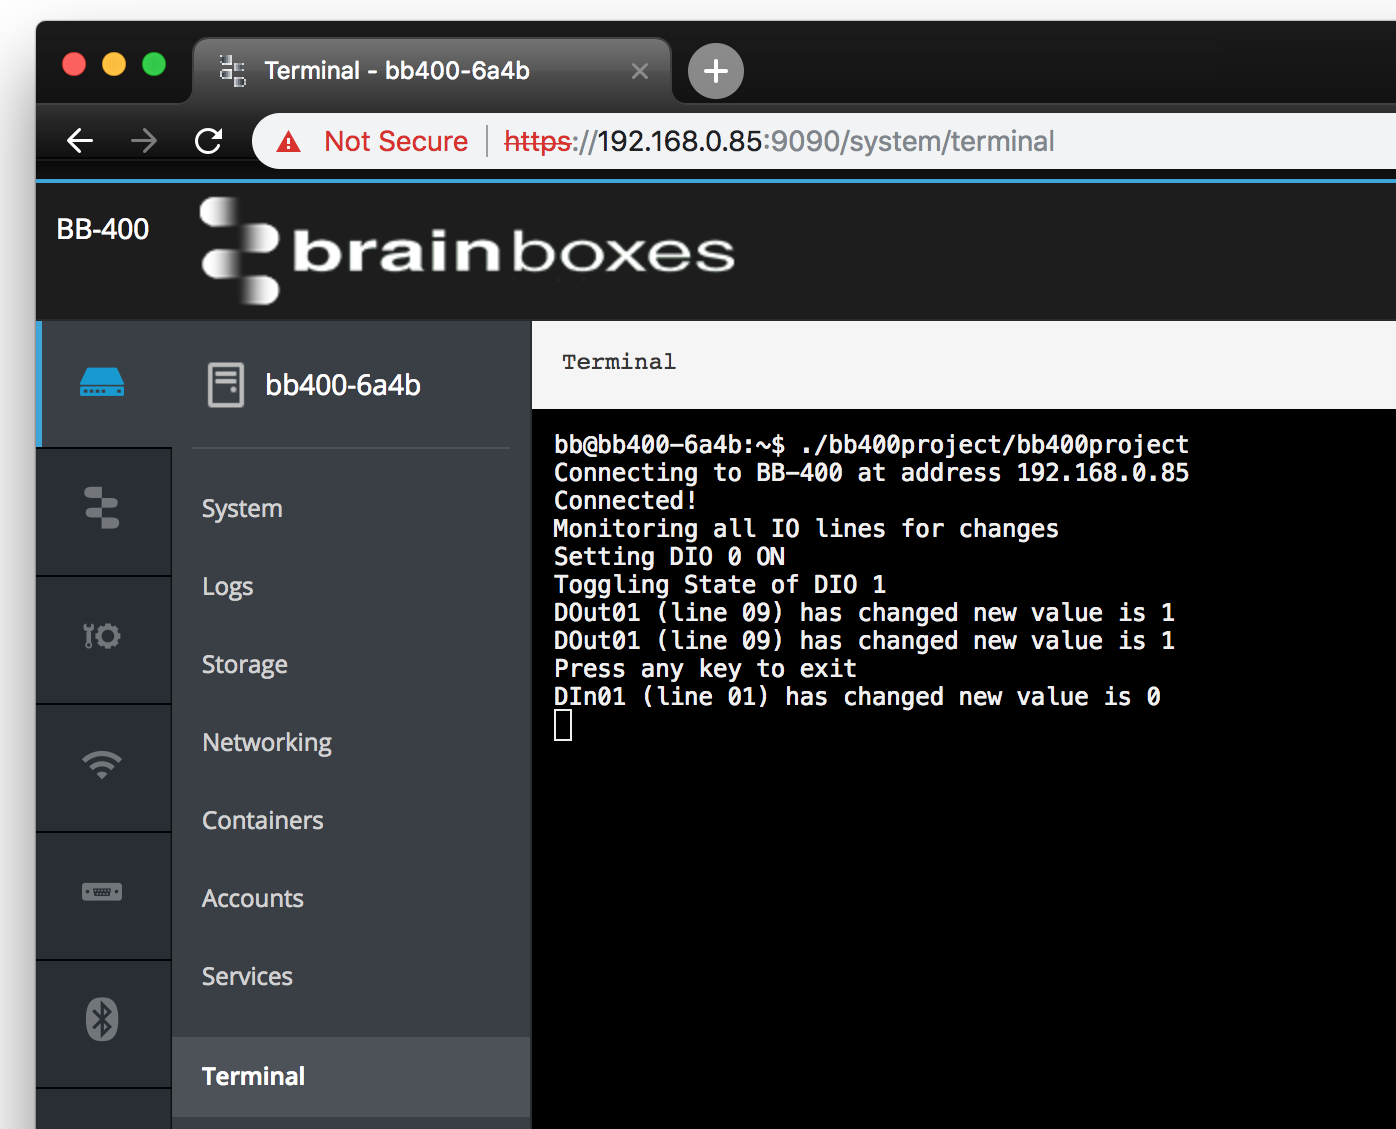
dio3and see that the running program shows that the output has changed. - In VS Code Terminal Panel you should see the following lines:
DIn03 (line 03) has changed new value is 0
DOut03 (line 11) has changed new value is 1 - The corresponding input also changes because electronically the DIO (Digital Input Output) lines can be inputs or outputs, changing the output state can also change the input state (if the device inputs are in NPN mode). This is normal behaviour and can be ignored. When you decide what you are connection each line to, e.g. an input or an output, you can ignore the opposite operation of the DIO line.
- To test changing an Input, use a paper clip or Wire to connect the a terminal block input to
V-. Pin 1 on the Green and Yellow terminal blocks areV-. - Connect Pin 2 on the YELLOW terminal block to Pin 1.
- In VS Code Terminal Panel you should see the following:
DIn04 (line 04) has changed new value is 0 - By default the inputs are in NPN mode, which means that they are HIGH if nothing is driving them. The input device, in this case a wire, drives the input to
V-and on the BB-400 web admin user interface you will see the arrow go LOW. - You have finished testing the DIO lines, stop debugging by pressing a key in the terminal panel, or pressing the STOP button on VS code debug tools.
Build the application and run it on the BB-400
- In VS Code Terminal panel type:
$ dotnet publish -r linux-arm - This will create a debug version of the project which can run on the BB-400 (to create a release version type
$ dotnet publish -c release -r linux-arm) - The dotnet command line interface will tell you where the new files have been created e.g.
bb400project -> /path/to/your/project/bb400project/bin/Debug/netcoreapp2.1/linux-arm/ - It is all the files in the
publishfolder which are required to run a dotnet core app in this mode - Copy the created folder over to the BB-400 home folder (
/home/bb/) into a directory calledbb400project:- on Windows use WINSCP to copy the folder
- on Linux or Mac OSX use rsync, in the VS Code terminal type
$ rsync -avzh bin/Debug/netcoreapp2.1/linux-arm/publish/ [email protected]:/home/bb/bb400project/. Be sure to change the ip to that of your BB-400, you will be asked for a password unless you have set up SSH keys. The first time the command is run everything will be copied, on subsequent invocations only the files that change will be copied over
- To run the application on the BB-400, open a BB-400 terminal – either through your OS terminal, or by logging in to the BB-400 web-admin and going to the web terminal
- In the terminal type:
$ ./bb400project/bb400project - You are now running the dotnet core application on the BB-400
Next Steps
- To learn more about the brainboxes.io .net API, read the docs at: http://www.brainboxes.com/files/pages/support/faqs/sample_code/Brainboxes.IO.Documentation/ and look at more advanced sample code: http://www.brainboxes.com/faq/items/how-do-i-use-c-sharp-to-communicate-with-my-remote-io-module
- When developing the application in VS Code: to automatically create runtime binaries and upload onto the BB-400 when you change your application in VS Code use extension ‘Deploy (Reloaded)’ and configure for the application
- When running on the BB-400: to make the application run at start up and restart if it fails: Set up a Systemd Service
- To deploy the application across many BB-400’s: Create a Docker Container and upload to docker hub, then add to the BB_CLI
FAQs