FAQs
There are plenty of adaptors on the market that offer a cable free connection from a device to your network. This FAQ explains how the TP Link Nano can be used to create a wireless connection from any Brainboxes’ Ethernet to Serial (ES) or Ethernet to Digital I/O (ED) device to a network.
NB: make a note of the IP address of your Brainboxes device before you start -you will need it to find your device later!
TP Link Nano Configuration with your Brainboxes device
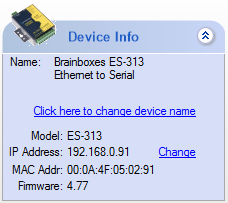 Take note of your Brainboxes device’s IP address. For this example we will be using an ES-313 with
the IP: 192.168.0.91.
Once you have finished this set-up the Brainboxes device will need to be manually re-added to the Boost.LAN/Boost.IO software. This is easily done using the IP address.
Connect devices
You’ll need a suitable power source for the TP Link adaptor and for your Brainboxes device. You’ll also need an Ethernet cable to connect the two together. You can find more information on connecting your Brainboxes device in the product manual, but you can always contact our support team if you need further assistance.
You will need to select the correct settings for your wireless adaptor, but don’t worry it is just a couple of clicks.
Open the TP Link Nano webpage. If you have not already configured your wireless adapter to connect to your network, you will need to click Quick Setup. If you’re using a TP Link Nano wireless adapter for the
first time, you may need to follow the instructions on their website. You can find their Quick Setup guide tutorial at http://www.tp-link.com/en/faq-396.html
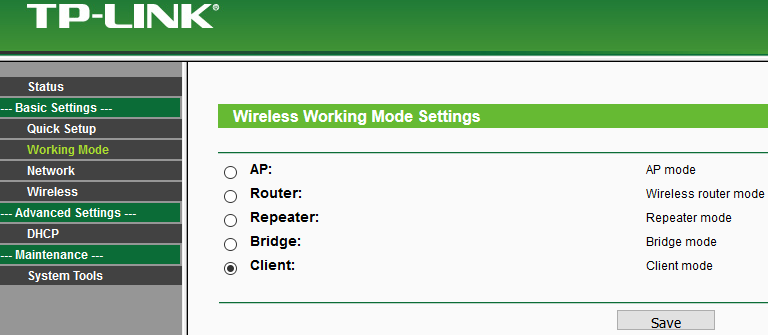
When you are set up simply click on ‘Working Mode’ in the basic settings and set your device to ‘Client’:
Everything is all configured and you’re ready to connect your TP Link Nano adaptor to your ES/ED
device.
And that’s it, it’s that simple!
If you’re using a different Wireless adapter (which does not block messages over Multicast), to see your
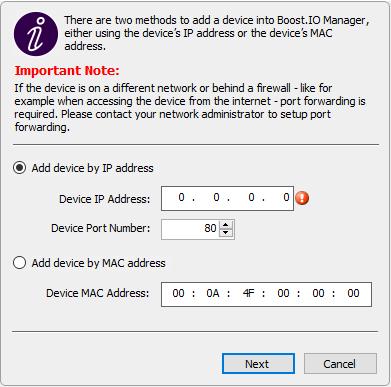
device again in Boost.IO/LAN, you will need to manually add it. Inside the software, click on ‘Tools’ then ‘Add Device Manually’ and insert the IP address of the device:
I still can’t see my Brainboxes unit in Boost.IO/LAN
Several wireless adapters available on the market block messages over Multicast. Wireless adapters which handle data this way cause Brainboxes devices to not appear inside the software, even when manually entering it in. The TP Link Nano is known for doing this.
I’m still getting an error but I don’t know what it is?
You can get additional help from the Brainboxes support team at [email protected]
Related FAQs
Related Products
FAQs