FAQs
1. Software & Equipment Requirements
| Software/Equipment | Details |
|---|---|
| Brainboxes BB-400 | Physical module |
| Mini USB to USB | For plugging your BB-400 into your PC |
| RPi-Boot | Used for accessing the eMMC memory on a Compute Module. Instructions and download available at https://www.raspberrypi.org/documentation/hardware/computemodule/cm-emmc-flashing.md Please follow the guide for building RPiBoot on Linux before starting |
Note: When removing the case on your BB-400, please take extreme caution when close to the large UPS Capacitors, and please take care with the ribbon cable as it can be easily damaged.
2. Summary
This is a guide to show the user how to create a full backup image of their OS and setup. Brainboxes recommends that users make backups of their complete setups in case any unrecoverable problems occur.
Please note: Creating an image file also backs up the MAC address. You will not want to copy this across many units.
3. Guide
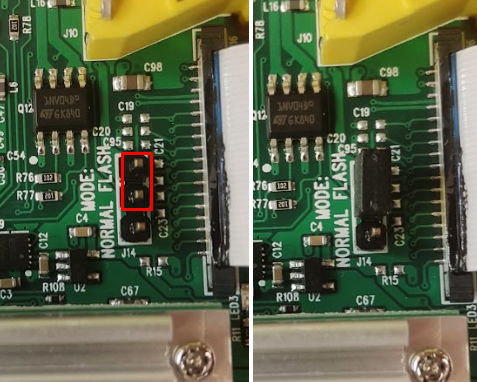
- With your module completely powered off (and the UPS drained), open the BB-400 case and move the MODE jumper into the FLASH position:
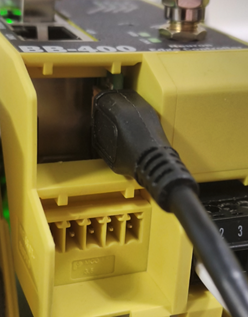
- Connect your Mini USB to USB cable from your module to your PC USB port:
- Run RPi-Boot* on the Linux system you have plugged your unit into:

- The instructions for setting up RPi-Boot on Linux are located on the Raspberry Pi website.
You will know that it’s finished when it returns you back to the command line. - When you are returned to the command line, RPi-Boot has now successfully mounted your BB-400 storage to its system. You will now want to run
lsblkto check all storage devices on the system, and identify your BB-400. To do this, look for the device which has the amount of storage memory your BB-400 has, and then check that it has 2 partitions called ‘rootfs’ and ‘boot’.
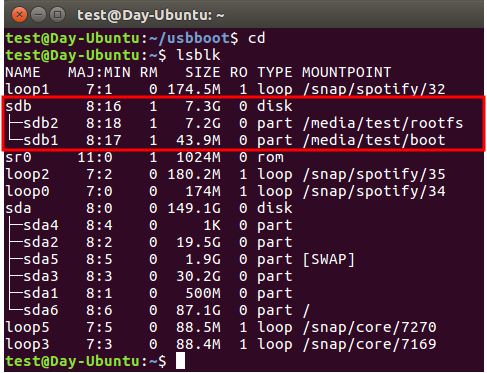
In this case, the storage memory size is 8GB, so /dev/sdb is the storage location I need to use. - Now you will be able to use ‘dd’, which is the perfect app on Linux for burning and creating .img files, and playing with storage devices on your system.
If you want to learn more about dd before moving forward, you can read this short article about How to use dd Linux.
It is possible to input a storage device which is associated to your Linux system, so please be careful!
$ sudo dd if=/dev/location of=backup.imgIt’s a very simple command, but it’s simply saying ‘copy this location (if=/dev/sdx) to this location (of=bkup.img)’. backup.img can be named and located anywhere you wish, for example:
$ sudo dd if=/dev/sdx of=/usr/share/backups/backup-20190710.imgAfter pressing ENTER, it will look as if the BB-400 has frozen or stopped, but it’s working on the backup in the background. Depending on the size of your storage, this operation may take a long time, so please allow it up to 1 hour for 32GB storage devices.
You will know the operation is finished when you are returned to the command line.
The backup has now complete!
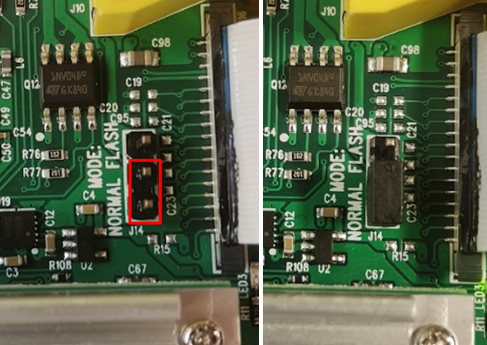
Now power off your BB-400, and allow a minimum of 5 minutes for the power to drain completely before moving the MODE jumper back into the NORMAL position.
4. Optional: Shrink backup size
The backup you have just made is the same size as the storage device you just backed up. On a standard Brainboxes image, the total amount of space (taken by the Raspbian operating system, BB-400 drivers & firmware, and Brainboxes software) is around 3GB of memory out of the 8GB or 32GB available on the Compute Module variants.
We recommend using PiShrink, which is a simple script written by Drewsif (https://github.com/Drewsif/PiShrink).
When you pass any image file to the script, it will shrink the whole size to the total it actually takes up. This means if you PiShrink a standard Brainboxes image, it will shrink it from 8/32GB to around 3GB.
The benefit of doing this is not only to save space on your system, but it also reduces the amount of time it takes to burn that image back to your BB-400.
FAQs