FAQs
Contents

1. Introduction
Node-RED is a visual programming tool aimed at connecting hardware devices, APIs and online services in alternative ways, without the need for traditional programming experience. The software provides a browser-based editor that makes it easy to wire together flows using the wide range of nodes in the palette that can be deployed to its run-time in a single-click.
Although the concept of flows, nodes & palettes may sound unfamiliar, Node-RED makes programming simple by using a visual representation of code in blocks with lines between them.
Some examples of the many functions available are:
- REST clients to query data on other servers
- Modbus TCP client to talk to Brainboxes Remote IO devices
- JavaScript functions can be created within the rich text editor
- A built-in library allows you to save useful functions, templates or flows for re-use
- The flows created in Node-RED are stored using JSON which can be easily imported and exported for sharing with others
- An online flow library allows you to share your best flows with the world.
2. Software & Equipment Requirements
You will need:
- A Brainboxes Remote Ethernet I/O device
- Any Windows PC/laptop
- Network connection
3. Installing Node-RED
The following are instructions on how to install Node-RED on a Windows based operating system. All required download links can be found on the official Node-RED and NodeJS websites.
3.1 Node.js
Node-RED uses a runtime engine called Node.js. Node.js is a JavaScript based programming language and must be installed before Node-RED. Node.js can be downloaded from the official Node.js website. When installing Node.js for use with Node-RED it is recommended that you install the 10.XX.X. LTS variant:

Once the installation is complete, open up a Windows command prompt, you can open a command prompt by using the keyboard shortcut (Windows key + r) type cmd and then once the command prompt has opened, input the following:
node --version && npm --version
This command checks if both Node.js and NPM are correctly installed, and if so it will return a version number.
The output should look something like this:

NPM is a package manager for the JavaScript programming language, this is needed for installing additional Node-RED packages which we will need later. NPM should be installed by default when installing Node.js.
3.2 Install Node-RED
Now we can begin to install Node-RED, navigate to CMD and input the command:
npm install -g --unsafe-perm node-red
Please note if the module does not install and throws up error messages regarding permissions, you will need to run CMD in Administrator mode. If you are having trouble with this please contact your System Administrator. Once this command is ran Node-RED will begin to install. Please note this can take some time to complete:

Once complete, the output should look like this:

4. Additional packages you will need
There are some additional packages you will need to install when following this guide.
4.1 Node-RED-dashboard
The first package you will need to install is the Node-RED dashboard, this module adds nodes which allow us to easily create a live data dashboard.
To install this module simply open up a command prompt and input:
npm install -g node-red-dashboardPlease allow a few minutes for this to package install:

Please note if the module does not install and throws up error messages regarding permissions, you will need to run CMD in Administrator mode. If you are having trouble with this please contact your System Administrator.
When the module is successfully installed the response should look something like this:

4.2 node-red-contrib-modbus
The next package you will need to install is contrib-modbus, this module adds nodes that allow us to communicate in ModbusTCP
To install this module simply open up a command prompt and input:
npm install -g node-red-contrib-modbus
Again, please allow a few minutes for this to install:

Please remember you may need to run this command on an elevated command prompt.
When the module is successfully installed the response should look something like this:

5 Running Node-RED
Once everything has been successfully installed you can now begin to run your Node-RED webserver.
You can do this by navigating to a command prompt and typing in the following command:
Node-RED
As we installed Node-RED as a global NPM module it adds the command node-red to your system path which you can then input into a command prompt to start Node-RED:

Once the server has booted up successfully the command prompt will let us know that the server is now running, and what IP address it is on:
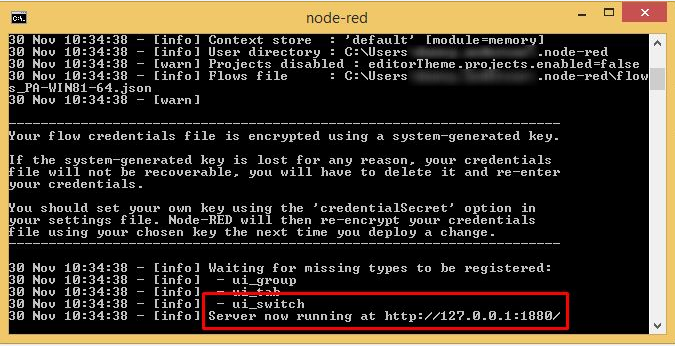
Take note of the Node-RED webserver’s IP address and input it into your web browser:

You have now successfully installed, booted up, and accessed your Node-RED webserver.
You can now begin to create your own flows.
6. An Overview of Node-RED
So how do we get started? Below is an overview of the Node-RED interface, with a brief description of each section:

6.1. Palette
The palette on the left contains all the different nodes available for use. From injecting different types of information (strings, Booleans, numbers, etc.), executing Linux command lines and the ability to make different types of connections, to recording simple debug traces, sending emails notifications and displaying information on a text box:
6.2. Workspace
The workspace in the middle is where your flows will be created. As you follow through this simple guide, you will learn how the flows connect and work together in an easy to use, programmable way.
The sidebar on the right provides additional settings and debug information. Using the debug node available from the palette will show the user what information is being sent, or the information which is being received from the node it is attached to.
6.4. Header
The header at the top, contains the deploy button, which is used for deploying your current workspace. Deploying it will make it available for execution, or it will immediately start running, depending on how you have it set up. You will also find the main menu which allows you to import/export workspaces, or change several configurations regarding your Node-RED project.
Related FAQs
Related Products
FAQs